shaderを使って、オブジェクトを移動・回転・拡縮させていこうと思います。通常、Meshだったりの移動・回転・拡縮は、position・rotation・scaleを使えば容易に変更可能ですが、shaderを使えば便利な場合もあります。備忘録も兼ねて紹介していこうかと思います。
Demo : https://misora.main.jp/cubeshader001/
1.Cube(BoxGeometry&ShaderMaterial)の作成
まず最初に、BoxGeometry&ShaderMaterialでCube(Boxオブジェクト)を作ろうと思います。Three.jsのコードになります。shaderMaterialのGLSL部分は、別ファイルにして読み込ませています。
three.js
//
const geometry = new THREE.BoxGeometry( 2, 2, 2 );

//
const material = new THREE.ShaderMaterial({
  uniforms : {
    positionMoveX: { value: 0.0 },
    positionMoveY: { value: 0.0 },
    positionMoveZ: { value: 0.0 },
    scaleSizeX: { value: 1.0 },
    scaleSizeY: { value: 1.0 },
    scaleSizeZ: { value: 1.0 },
    rotationAngleX: { value: 0.0 },
    rotationAngleY: { value: 0.0 },
    rotationAngleZ: { value: 0.0 },
  },
  vertexShader:Vertex,
 fragmentShader: Fragment,
  vertexColors: true,
  blending: THREE.NormalBlending,
  //side:THREE.DoubleSide,
  wireframe:true,
  transparent:true,
});

const Cube = new THREE.Mesh(geometry, material);
Cube.position.set(0, 0, 0);
scene.add( Cube );
vertex.glsl
//vertex.glsl

uniform float positionMoveX;
uniform float positionMoveY;
uniform float positionMoveZ;
uniform float scaleSizeX;
uniform float scaleSizeY;
uniform float scaleSizeZ;
uniform float rotationAngleX;
uniform float rotationAngleY;
uniform float rotationAngleZ;

varying vec2 vUv;
varying vec3 vColor;

void main() {
  vUv = uv;
  vColor = color;

  //
  vec4 worldPosition = modelMatrix * vec4(position, 1.0) ;
  vec4 mvPosition =  viewMatrix * worldPosition;

  gl_Position = projectionMatrix * mvPosition;

}
fragment.glsl
//fragment.glsl

varying vec2 vUv;
varying vec3 vColor;

void main()
{
  //
  vec3 color = vColor;
  // 出力
  gl_FragColor = vec4(color, 1.0);
}
ワイヤーフレームのCube(Box)ができると思います。

2.移動・回転・拡縮
shaderでの移動・回転・拡縮は、vertex(頂点)側で、Positionの値を変更すれば可能ですね。
行列の知識が必要になります。以下のサイトが端的でわかりやすかったです。高校・大学で学習して忘れている方が大半だと思います。わたしもそうでした。
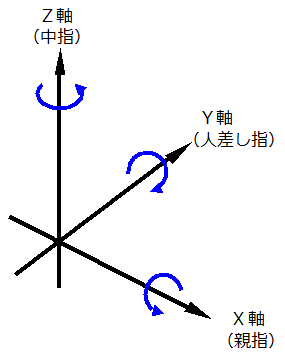
行列の式をvertex.glslに適応させていきましょう。
vertex.glsl
//vertex.glsl

uniform float positionMoveX;
uniform float positionMoveY;
uniform float positionMoveZ;
uniform float scaleSizeX;
uniform float scaleSizeY;
uniform float scaleSizeZ;
uniform float rotationAngleX;
uniform float rotationAngleY;
uniform float rotationAngleZ;

varying vec2 vUv;
varying vec3 vColor;


vec3 rot3D(vec3 p, vec3 axis, float angle){
  return mix( dot(axis, p) * axis, p, cos(angle) )
  + cross(axis, p) * sin(angle);
}

mat2 rot2D(float angle){
  float s = sin(angle);
  float c = cos(angle);
  return mat2(c,-s,s,c);
}


void main() {
  vUv = uv;
  vColor = color;

  //平行移動行列
  mat4 MoveMatrix = mat4(
    1, 0, 0, positionMoveX,
    0, 1, 0, positionMoveY,
    0, 0, 1, positionMoveZ,
    0, 0, 0, 1
  );
  //拡大縮小行列
  mat4 ScaleMatrix = mat4(
    scaleSizeX, 0, 0, 0,
    0, scaleSizeY, 0, 0,
    0, 0, scaleSizeZ, 0,
    0, 0, 0, 1
  );
  //X軸回転
  mat4 rotationMatrixX = mat4(
    1, 0, 0, 0,
    0, cos(rotationAngleX), -sin(rotationAngleX), 0,
    0, sin(rotationAngleX), cos(rotationAngleX), 0,
    0, 0, 0, 1
  );
  //Y軸回転
  mat4 rotationMatrixY = mat4(
    cos(rotationAngleY), 0, sin(rotationAngleY), 0,
    0, 1, 0, 0,
    -sin(rotationAngleY), 0, cos(rotationAngleY), 0,
    0, 0, 0, 1
  );
  //Z軸回転
  mat4 rotationMatrixZ = mat4(
    cos(rotationAngleZ), -sin(rotationAngleZ), 0, 0,
    sin(rotationAngleZ), cos(rotationAngleZ), 0, 0,
    0, 0, 1, 0,
    0, 0, 0, 1
  );

  //PostionChange Rotation * position * move * scale
  vec4 R_Position = rotationMatrixX * rotationMatrixY * rotationMatrixZ * vec4(position, 1.0) * MoveMatrix * ScaleMatrix;
  //
  vec4 worldPosition = modelMatrix * R_Position;
  vec4 mvPosition =  viewMatrix * worldPosition;

  gl_Position = projectionMatrix * mvPosition;

}
これを、three.js側で適切な値を代入させて回転させていきます。アニメーションにGSAPを使います。npmでインストールしましょう。

HTMLのボタンをクリックしたら、おのおのが実行するように設定しています。
three.js(移動・回転・拡縮)
import gsap from "gsap";

~

/* HTML側で、document.getElementByIdに対応するタグを作成ください。*/
/* move */
document.getElementById("moveUp-Btn").addEventListener("click", () => function(){

  let Hold = 0;

  gsap.to((Cube), 0.4,{ //0.4sのアニメーション
    onStart: function() {},
    onUpdate: function() {
      const  add = 2.0 * this.progress() - Hold; //2.0 移動します。
      Hold = 2.0 * this.progress() ;
      Cube.material.uniforms.positionMoveY.value += add;
    },
    onRepeat: function() {},
    onComplete:function(){},
  });
}());

/* Rotation */
document.getElementById("up-Btn").addEventListener("click", () => function(){

  let Hold = 0;

  gsap.to(Cube, {
    duration: 0.4, //0.4sのアニメーション
    onStart: function() {},
    onUpdate: function() {
      const  add = ( Math.PI / 2 ) * this.progress() - Hold; //90度回転します。
      Hold = ( Math.PI / 2 ) * this.progress();
      Cube.material.uniforms.rotationAngleX.value += add;
    },
    onRepeat: function() {},
    onComplete:function(){},
  });
}());

/*Scale*/
document.getElementById("scaleU-Btn").addEventListener("click", () => function(){

  let Hold = 0;

  gsap.to((Cube), 0.4,{ //0.4sのアニメーション
    onStart: function() {},
    onUpdate: function() {
      const  add = 1.0 * this.progress() - Hold; //1.0が拡大率
      Hold = 1.0 * this.progress();
      Cube.material.uniforms.scaleSizeX.value += add;
      Cube.material.uniforms.scaleSizeY.value += add;
      Cube.material.uniforms.scaleSizeZ.value += add;
    },
    onRepeat: function() {},
    onComplete:function(){},
  });

}());
HTML側で、document.getElementByIdに対応するタグを作成ください。
これで、0.4sでアニメーションして移動・回転・拡大してくれます。移動ではpositionMoveYをX、Zに変えて方向を調整ください。回転もrotationAngleXをY、Zに変更することで変更できます。おのおので追加していってください。

3.完成!
非常に簡単でしたね!
同じマテリアルなら、適応させたMeshすべて同じ動き(移動・回転・拡縮)をします。使いどこによっては、非常に一体感がある良い動きになりそうです。大量のオブジェクトを動かしたりする案件で、CPUをなるべく使いたくないときに、取り入れてはいかがでしょうか?
ということで、shaderの基礎って感じでしたね。
初音ミク・プログラミングコンテストの際に、作ったのですが出番がありませんでした。備忘録して、また使えるときがあれば使いたい基礎テクニックですね。
Demo : https://misora.main.jp/cubeshader001/
元の位置(Meshでに位置)を動かていないので、カメラの判定で描画されないことがあります。おって修正いたします。