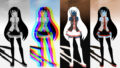
adobeのMixamoを使って、デモにある人が歩くシーンを作っていこうかと思います。基本的なものですが、備忘録を兼ねて紹介しようと思います。
【Demo】https://misora.main.jp/human/
Blenderを使いますので、ダウンロードお願いします。
1. Mixamoからモデルとアニメーションを取得する
Mixamoからフリーのモデルとアニメーションを取得して、Blenderを使って、Three.jsで使える形式(glTF)にしていきます。Mixamoを使うには、会員登録する必要があるので、登録を済ませておきましょう。
Mixamo


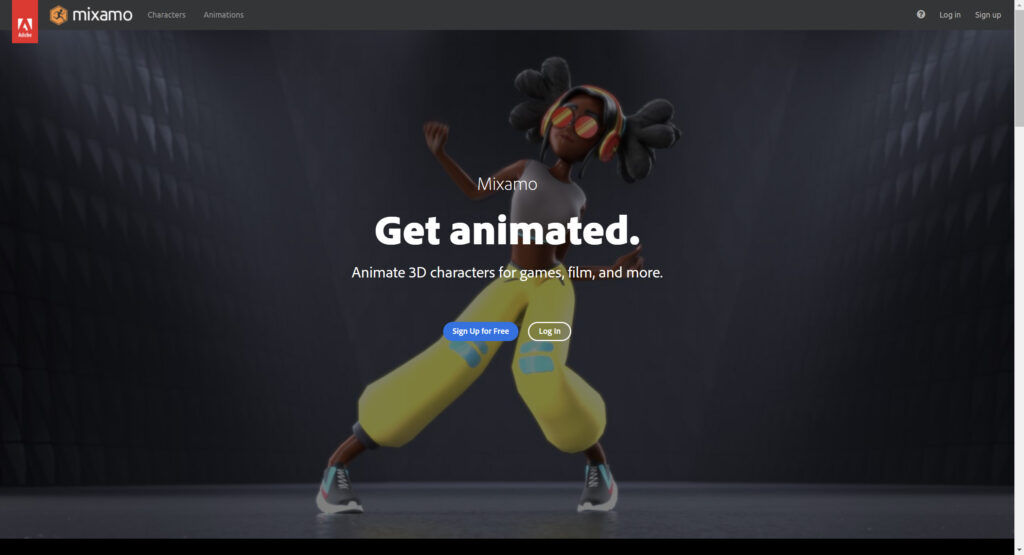
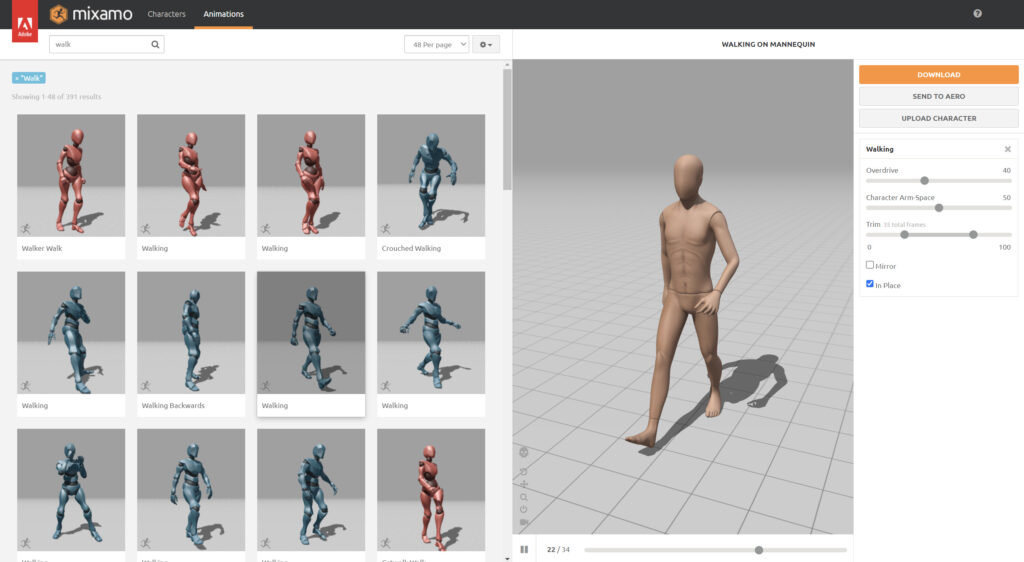
キャラクターを最初に選択します。(デモ版はMannequinを使用)
Animation タブを選び、「walk」と検索して、以下のモーションを選択、「in Place」にもチェックを入れましょう。
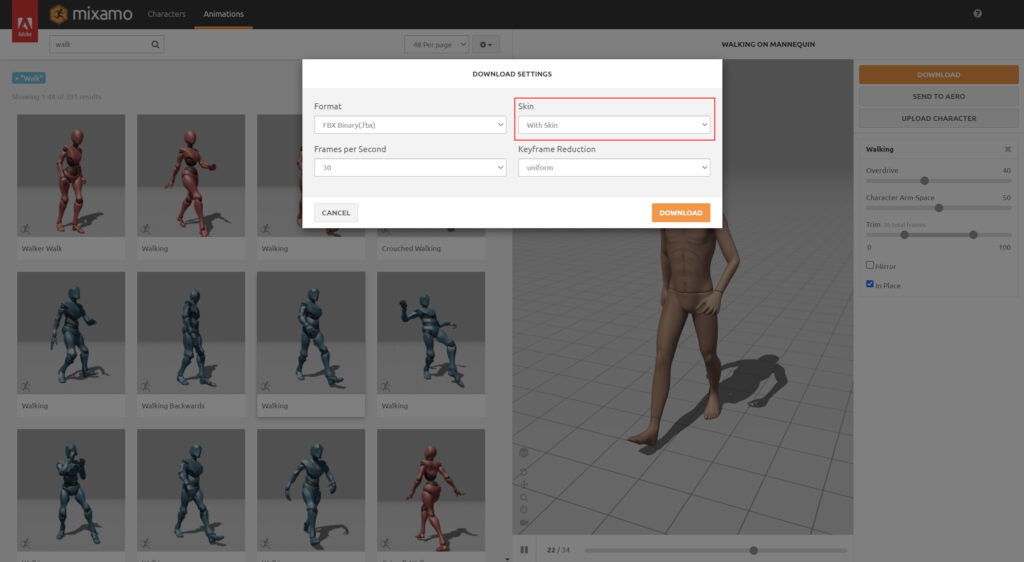
Downloadボタンから、「with in Skin」でモデルデータ込みでダウンロードします。(Walking.fbx)
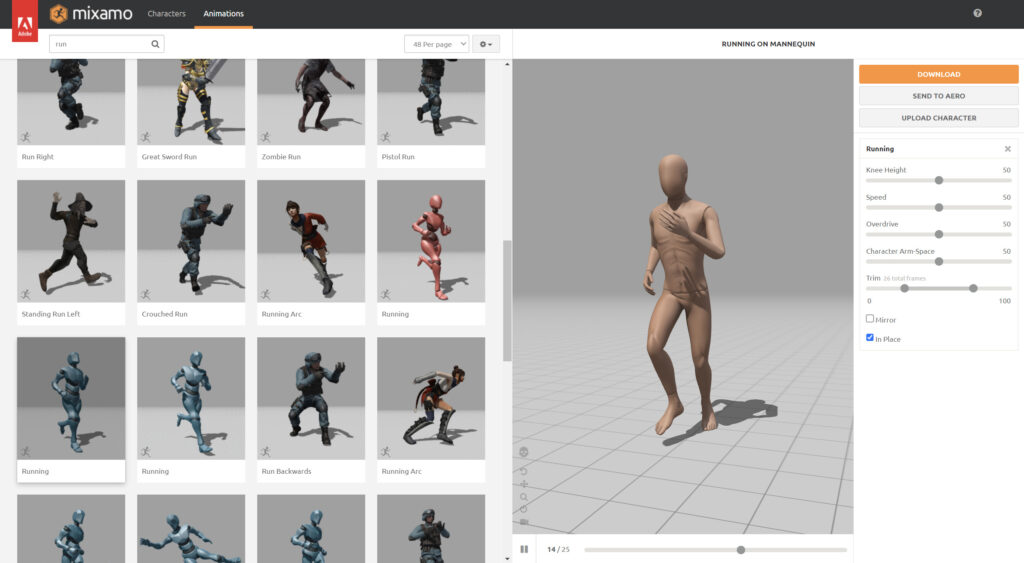
Animation タブから「Run」と検索して、以下のモーションを選択、「in Place」にもチェックを入れましょう。
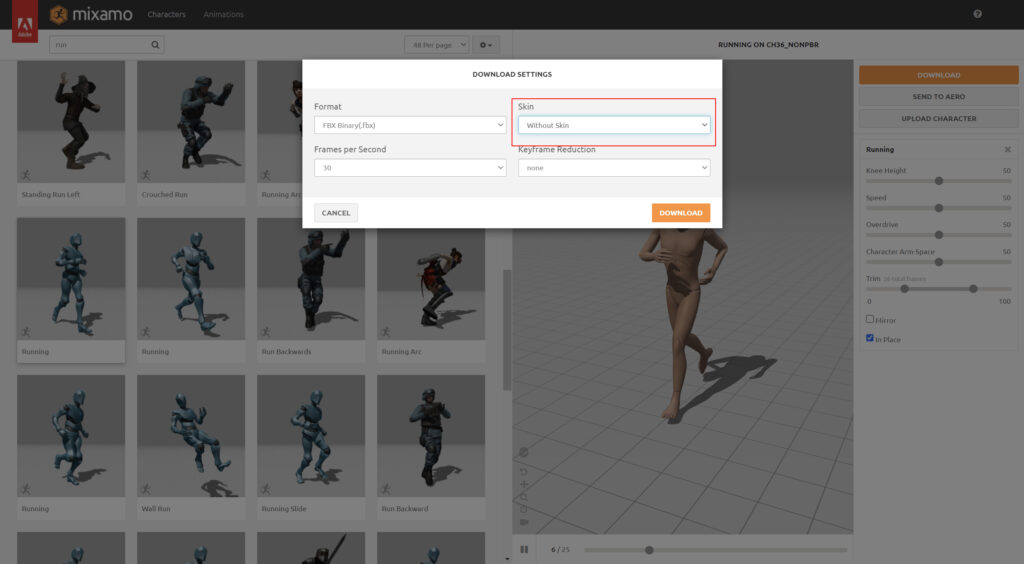
Downloadボタンから、「without in Skin」でモデルデータなしでダウンロードします。(Running.fbx)
Mixamoは、これで終了です。
Blenderで編集
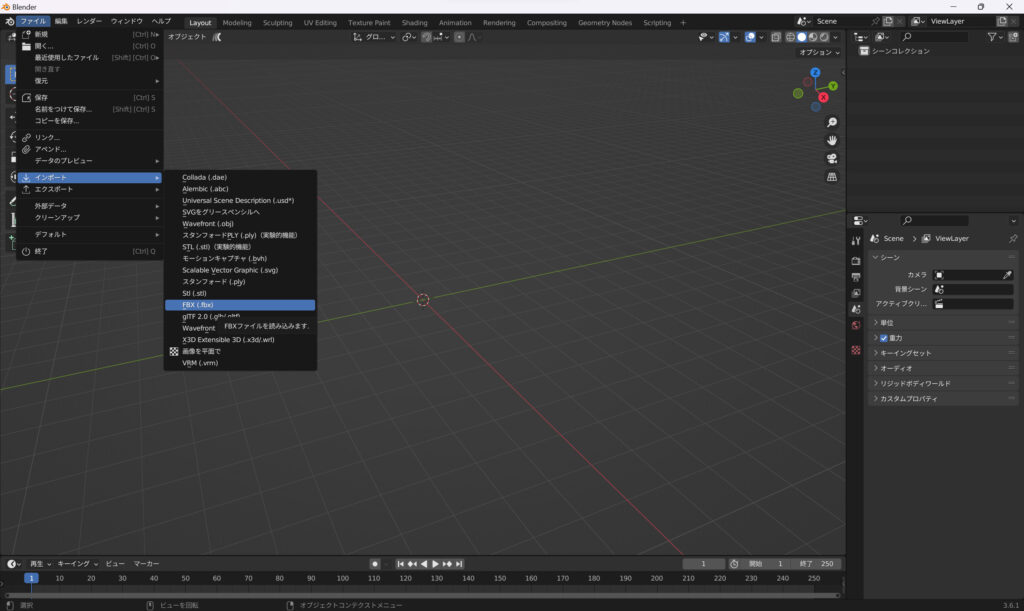
先ほど、ダウンロードしたfbxファイルをBlenderで読み込みます。Walking.fbx、Running.fbxの順に読み込んでください。
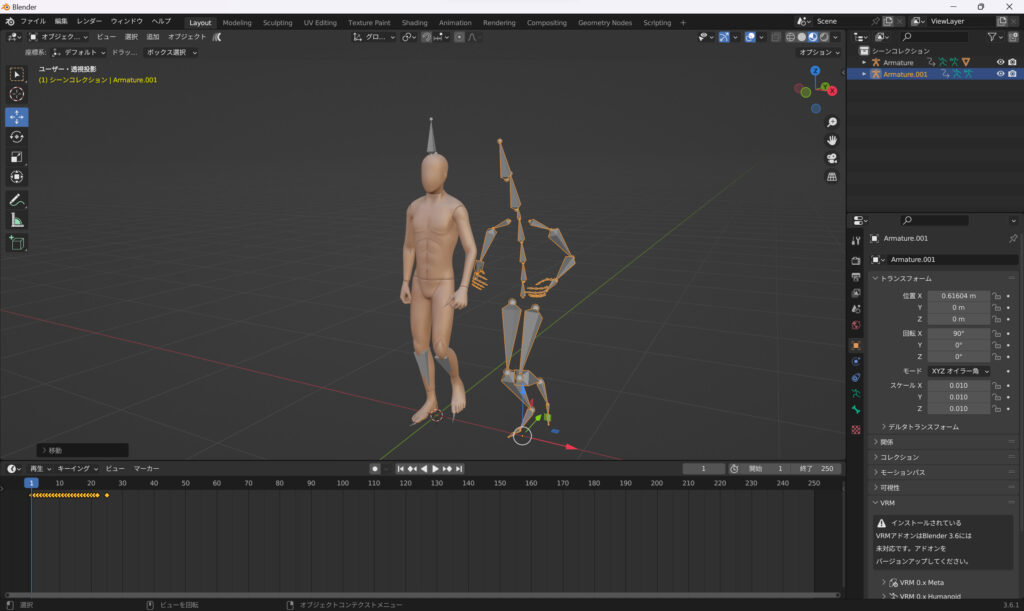
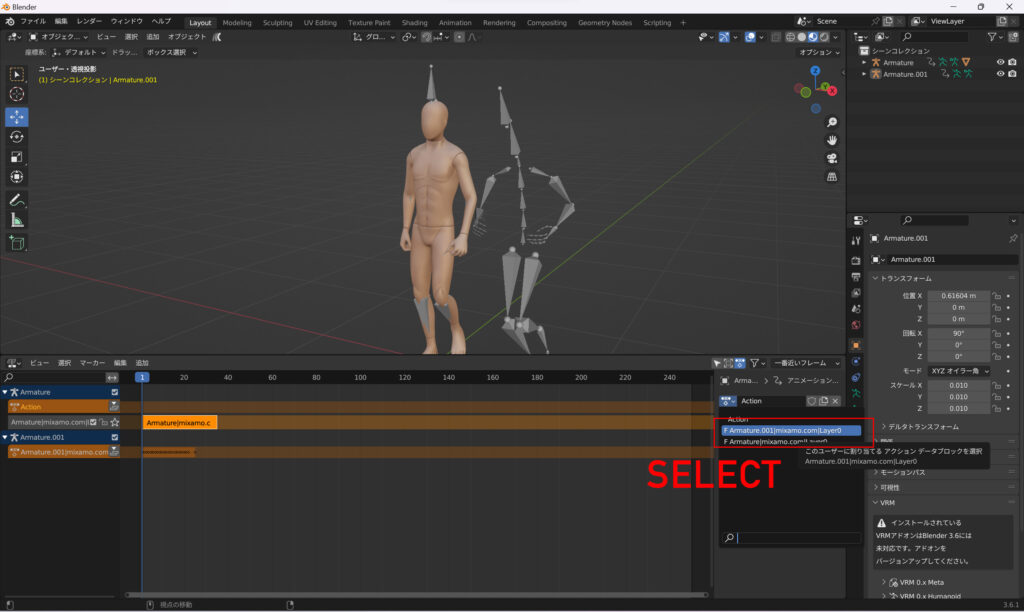
Integrate the running animation into walking with model data.
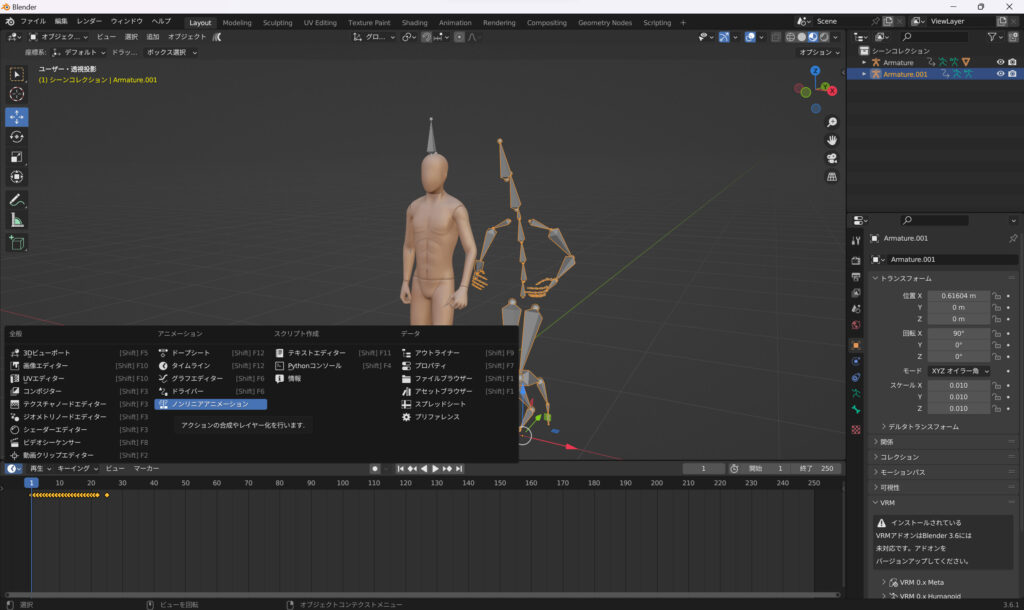
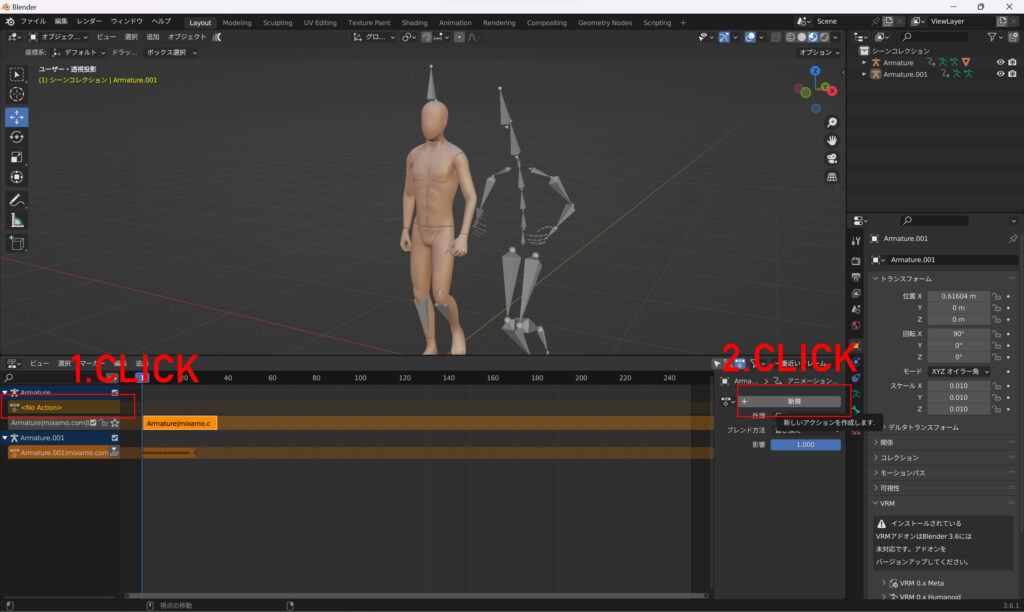
Switch from the editor type to the Nonlinear Animation tab.
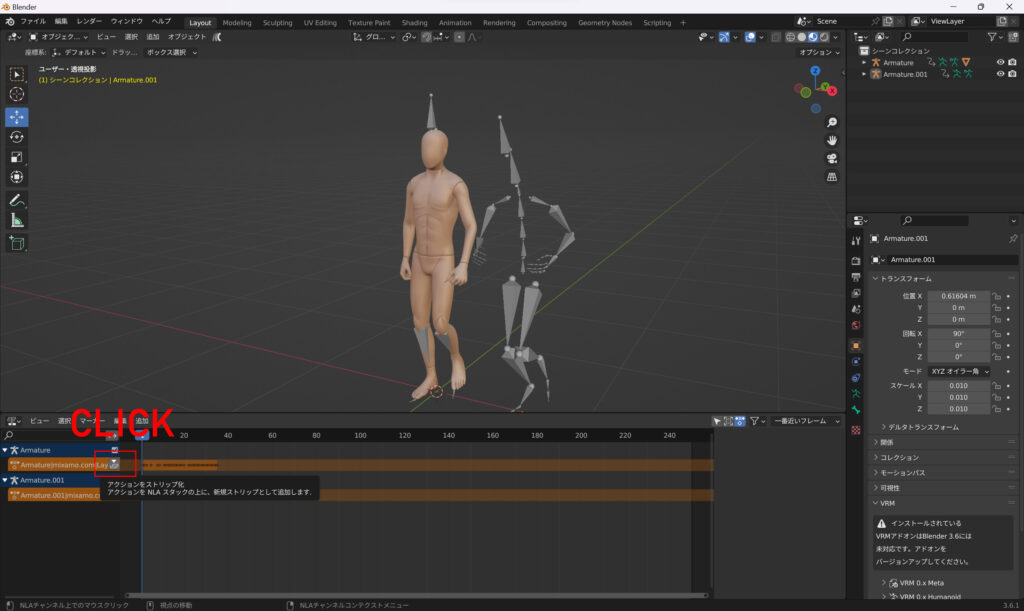
Click the No Action button and click New.
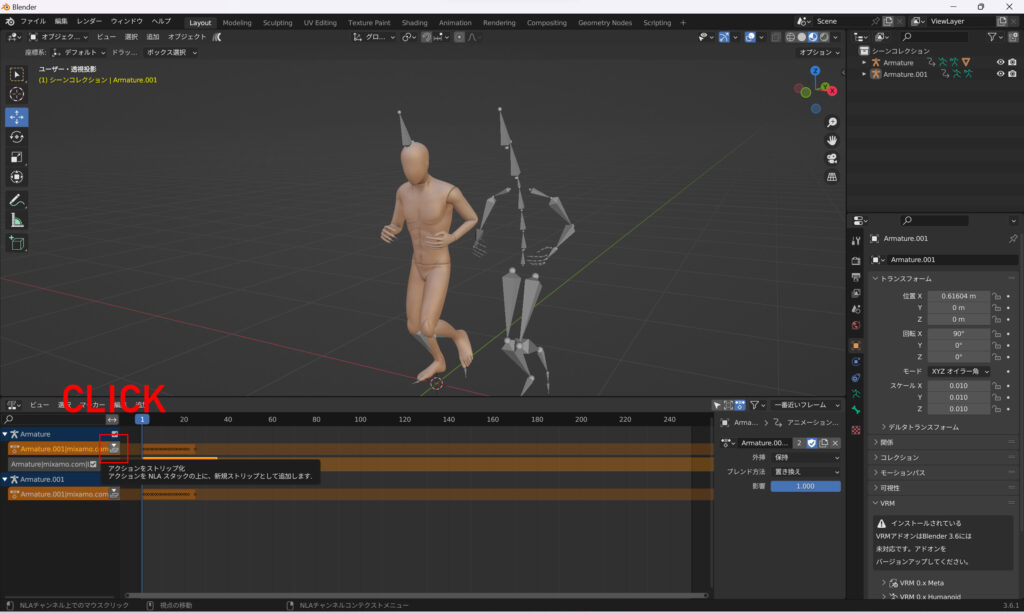
Animation integration is complete. Delet Running Armature.

Adjust materials. Delete the existing material and paste a new gray material.
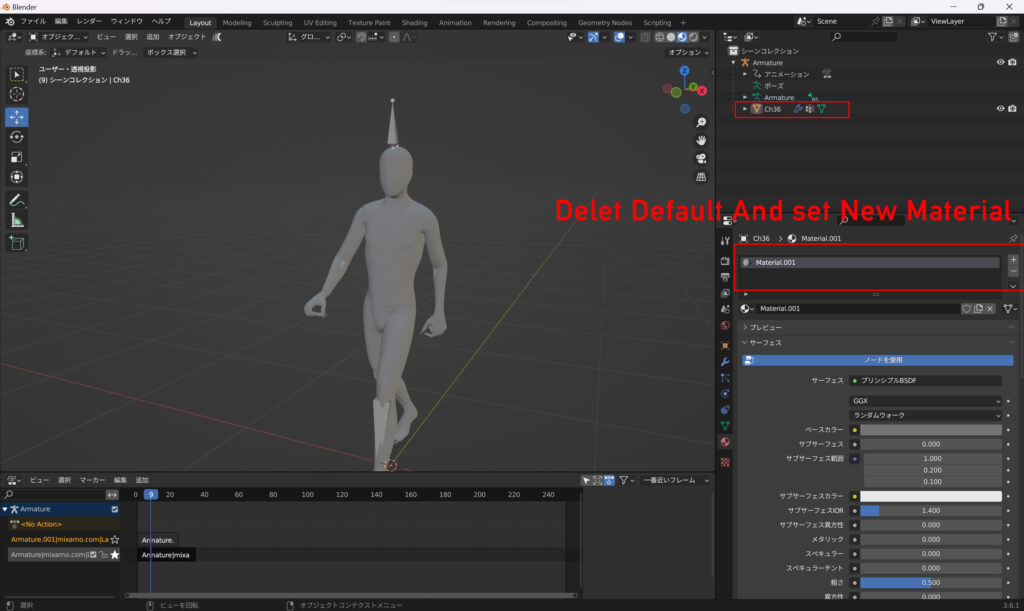
Output the created model as a glTF file (human.glb).
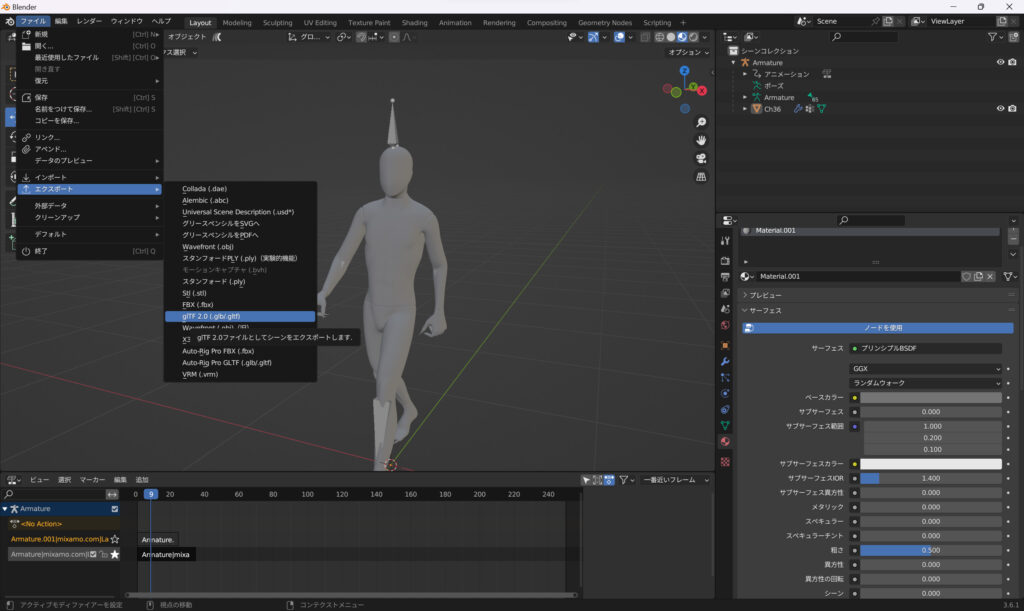
(圧縮で出力すると、Three.jsでDRACOLoaderが必要になります。)
The model creation is complete.
2.モデルを表示、アニメーションさせる
three.js でモデルを表示させて、アニメーションもさせます。以下をコピペすればOKです。walking とRunのアニメーションの切り替えは、action[0] or action[1]で変更できます。
three.js
import { GLTFLoader } from 'three/examples/jsm/loaders/GLTFLoader.js'
//import { DRACOLoader } from 'three/examples/jsm/loaders/DRACOLoader.js'
//
let modelSet = false; //モデルの読み込みが完了したかのフラグ
let mixer;
let action =[];
let activeAction;
let humanObject;
////////////////////////////////////////////////
const loader = new GLTFLoader();
loader.load( 'models/human.glb', function ( gltf ) {
gltf.scene.scale.set(2,2,2);
gltf.scene.traverse((object) => {
if(object.isMesh) {
object.castShadow = true;
object.receiveShadow = true;
}
});
humanObject = gltf.scene; // copy
humanObject.position.set(0,0,4); // init position
const animations = gltf.animations;
if(animations && animations.length) {
//Animation Mixerインスタンスを生成
mixer = new THREE.AnimationMixer(gltf.scene);
//全てのAnimation Clipに対して
for (let i = 0; i < animations.length; i++) {
const clip = animations[i]
//Animation Actionを生成
action.push(mixer.clipAction(clip));
}
//Set Animation
//activeAction = action[0]; //Run Animation
activeAction = action[1]; //Walk Animation
// Animation Play
activeAction.play();
}
scene.add( humanObject );
modelSet = true;
}, undefined, function ( error ) {
console.error( error );
} );const clock = new THREE.Clock();
function renderLoop() {
//stats.begin();//stats計測
const delta = clock.getDelta();//animation programs
if(modelSet == true){
mixer.update( delta ); //Animation update
humanObject.position.z += delta * 2.5; // position update // walk Speed
//Position Loop
if(humanObject.position.z > 20){
humanObject.position.x = 0;//(Math.random()-0.5)*10;
humanObject.position.z = -12;
}
}
renderer.render(scene, camera) // render the scene using the camera
requestAnimationFrame(renderLoop) //loop the render function
//stats.end();//stats計測
}
renderLoop() //start renderingthree.js (Set Shadow)
~
/*renderer*/
renderer.shadowMap.enabled = true;

~
/* SpotLight */
const spotLight = new THREE.SpotLight( 0xffffff, 10.0); //2.3
spotLight.position.set( 0, 15, 30 );
spotLight.castShadow = true;
spotLight.angle = Math.PI / 6;
spotLight.penumbra = 1;
spotLight.decay = 2;
spotLight.distance = 300;
//
spotLight.shadow.mapSize.width = 1024; // 512, 1024, 2048, 4096,
spotLight.shadow.mapSize.height = 1024; // 512, 1024, 2048, 4096,
spotLight.shadow.camera.near = 0.5; // default
spotLight.shadow.camera.far = 300; // default
scene.add( spotLight );
three.js (Ground)
const geometry = new THREE.PlaneGeometry( 250, 250, 50, 50 );
const material = new THREE.MeshStandardMaterial( {
  color: 0xFFFFFF,
} );
const plane = new THREE.Mesh( geometry, material );
plane.rotation.x = -Math.PI /2;
scene.add( plane );

const shadowmaterial = new THREE.ShadowMaterial({
  color: 0x444444,
});
const shadow_plane = new THREE.Mesh( geometry, shadowmaterial );
shadow_plane.position.set(0, 0, 0);
shadow_plane.rotation.set(-Math.PI/2, 0, 0);
shadow_plane.receiveShadow = true;
shadow_plane.visible = true;
scene.add( shadow_plane );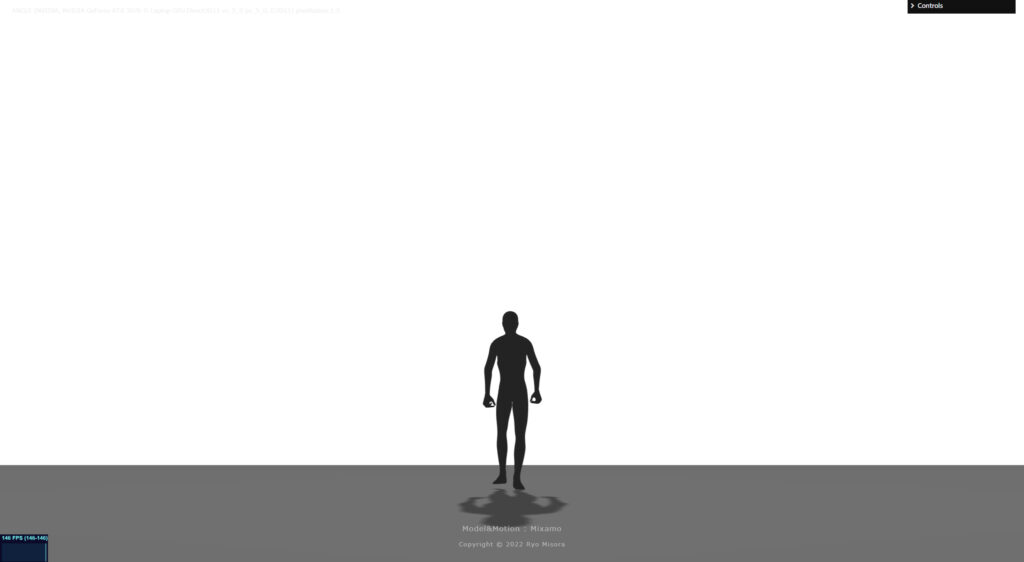
上記のようになると思います。Fog をセットしましょう。
const scene = new THREE.Scene()
scene.background = new THREE.Color('#FFFFFF');
// new THREE.Fog( color, near, far );
scene.fog = new THREE.Fog(0xFFFFFF, 1, 20);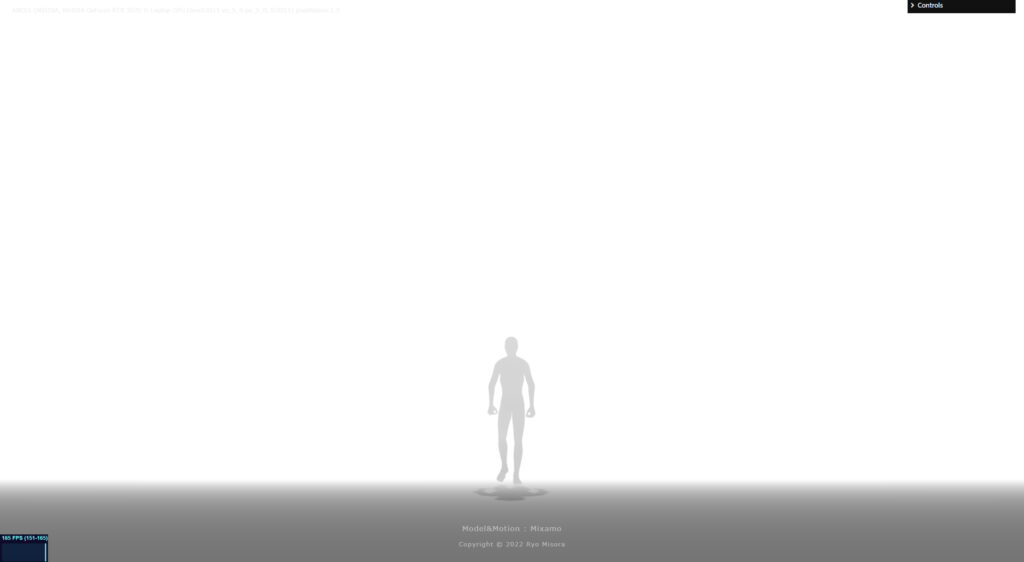
印象的になりました。OKです!
3.モデルを複製する
同じモデルを単純に複製(クローン)して、たくさんの人を出演させます。SkinnedMesh専用のクローンを用意する必要があります。今回は、2体分(humanObjectA,humanObjectB)複製します。
humanObjectAは、Running-アニメーション。humanObjectBは、walk-アニメーションに設定しています。
three.js
import { clone } from 'three/examples/jsm/utils/SkeletonUtils.js';//
let modelSet = false;//モデルの読み込みが完了したかのフラグ
//
let mixer;
let action =[];
let activeAction;
let humanObject;
// Clone Human
let mixerA,mixerB;
let actionA =[];
let actionB =[];
let activeActionA,activeActionB;
let humanObjectA,humanObjectB;
////////////////////////////////////////////////
const loader = new GLTFLoader();
loader.load( 'models/human.glb', function ( gltf ) {
gltf.scene.scale.set(2,2,2);
gltf.scene.traverse((object) => {
if(object.isMesh) {
object.castShadow = true;
object.receiveShadow = true;
}
});
humanObject = gltf.scene;
humanObject.position.set(0,0,8);
const animations = gltf.animations;
if(animations && animations.length) {
mixer = new THREE.AnimationMixer(gltf.scene);
for (let i = 0; i < animations.length; i++) {
const clip = animations[i]
//Animation Actionを生成
action.push(mixer.clipAction(clip));
}
//activeAction = action[0]; //Run Animation
activeAction = action[1]; //Walk Animation
activeAction.play();
}
scene.add( humanObject );
// Clone
humanObjectA = clone(gltf.scene);
humanObjectA.position.set(2,0,-6);
humanObjectB = clone(gltf.scene);
humanObjectB.position.set(-2,0,-6);
//const animations = modelData.animations;
if(animations && animations.length) {
// Animation Mixerインスタンスを生成
mixerA = new THREE.AnimationMixer(humanObjectA);
mixerB = new THREE.AnimationMixer(humanObjectB);
//全てのAnimation Clipに対して
for (let i = 0; i < animations.length; i++) {
const clip = animations[i]
//Animation Actionを生成
actionA.push(mixerA.clipAction(clip));
actionB.push(mixerB.clipAction(clip));
}
// 再生タイミングをずらす
setTimeout(() => {
activeActionA = actionA[0]; // Run
activeActionA.play();
}, "100");
setTimeout(() => {
activeActionB = actionB[1]; // Walk
activeActionB.play();
}, "200");
}
scene.add( humanObjectA );
scene.add( humanObjectB );
modelSet = true;
}, undefined, function ( error ) {
console.error( error );
} );const clock = new THREE.Clock();
function renderLoop() {
//stats.begin();//stats計測
const delta = clock.getDelta();//animation programs
if(modelSet == true){
mixer.update( delta );
humanObject.position.z += delta * 2.5; // walk Speed
//Position Update
if(humanObject.position.z > 20){
humanObject.position.x = 0; //(Math.random()-0.5)*10;
humanObject.position.z = -12;
}
// Clone
mixerA.update( delta );
mixerB.update( delta );
humanObjectA.position.z += delta * 6.5; // Run Speed
humanObjectB.position.z += delta * 2.5; // walk Speed
if(humanObjectA.position.z > 20){
humanObjectA.position.x = 2; //(Math.random()-0.5)*10;
humanObjectA.position.z = -12;
}
if(humanObjectB.position.z > 20){
humanObjectB.position.x = -2; //(Math.random()-0.5)*10;
humanObjectB.position.z = -12;
}
}
renderer.render(scene, camera) // render the scene using the camera
requestAnimationFrame(renderLoop) //loop the render function
//stats.end();//stats計測
}
renderLoop() //start rendering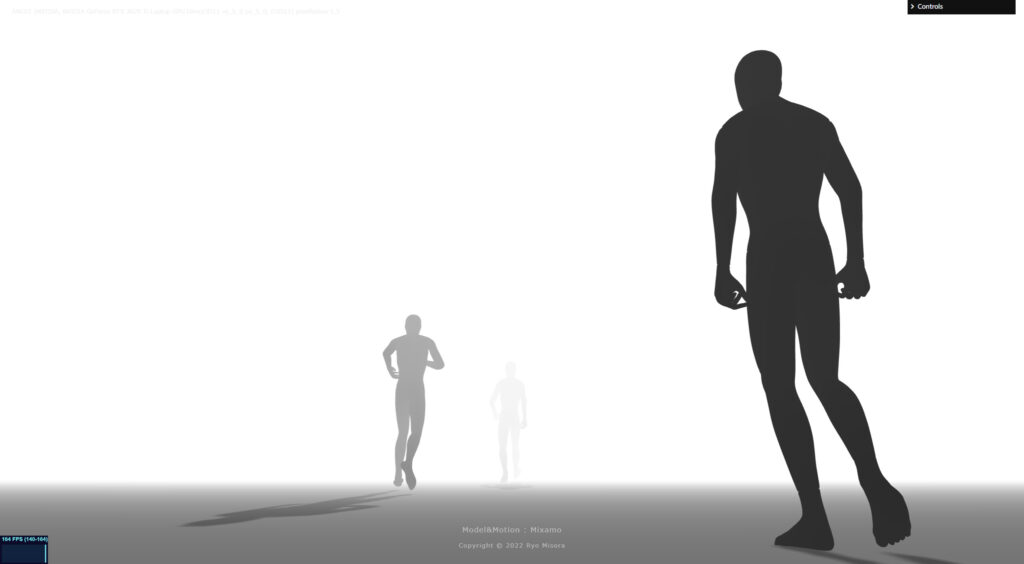
4.完成!
お疲れ様です!
クローンの人数を増やせば、デモのようになります。デモは4体をクローンして、5人の人間がループするようにしています。ランダムで開始位置をずらして、それっぽく見せています。シュールな光景ですが、なかなか気にいっている作品です。
【Demo】https://misora.main.jp/human/
Blenderの操作が難しいと思いますが、慣れだと思いますので触っていえば解決できると思います。私も、まだまだBlenderは扱えないですが、これからきちんと勉強したいと思っています。
もし良ければもう一つ記事を読んでいただき、Xをフォローしていただけると嬉しいです。